There are many visual testing tools (comparison tests) available right now. Some of them are free to use, others involve pricey subscriptions and various limitations. The goal was to find an affordable solution that would deliver all the needed features and customization.
Differencify – a library that covers popular needs
Differencify is a library created by Nima Naroush with almost 400 stars on GitHub (as of 29 July 2019). I runs on top of Puppeteer (a Node library which provides a high-level API) to control Chrome or Chromium over the DevTools Protocol. You can find it here. Puppeteer allows to manipulate browser behavior with custom scenarios, not only those predicted by the Differencify creator. It’s also strongly connected with the Jest testing framework (more about it below).
Differencify can be cloned from here. Because it is based on the MIT license, we can use commercially without additional permissions and make some modifications to it.
Example Repo
The solution’s usage example can be found here. First, look at the master branch and try to analyze what’s going on.
/distdirectory holds example HTML and CSS files that will be served as development server/testsholds test scenarios and Differencify images outputPackage.json, bitbucket-pipelines, dockerfilewill be discussed in details in the following chapters
To see how tests work with pipelines, take a closer look at difference-example and no-difference branches, and trigger manual step on one of the PRs
Main Functionality
The most important feature of Differencify for us was the possibility to compare styleguides and find any unexpected differences.
First, we need to generate snapshots. Keep in mind that if they’re not ready yet, the test will pass and current output will be treated as correct. The following tests will be checked based on them.
If you want to generate snapshots even if some of them already exist, you can use the --updateSnapshot flag.
After the snapshots have been generated automatically by the first test run or the --updateSnapshot flag, the test will pass only if visited pages (by the written scenario) give identical output to the snapshots. Keep in mind that some animations like fading can affect snapshots so it’s quite a good idea to use a couple of seconds of timeout before capturing a shot. You can achieve that with the .waitFor(timeout); parameter in the test description.
Failed Tests
If there were some changes on pages affecting the visual layer of the application, the test will fail. You’ll be informed about it by the testing framework you’re using, or by the value returned from the result object (boolean).
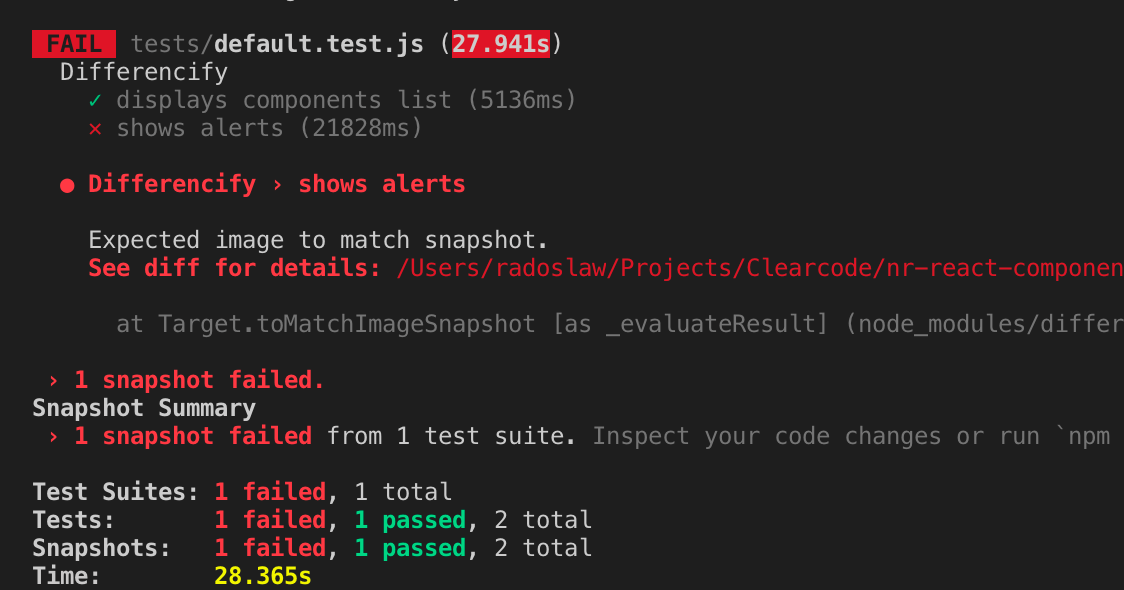
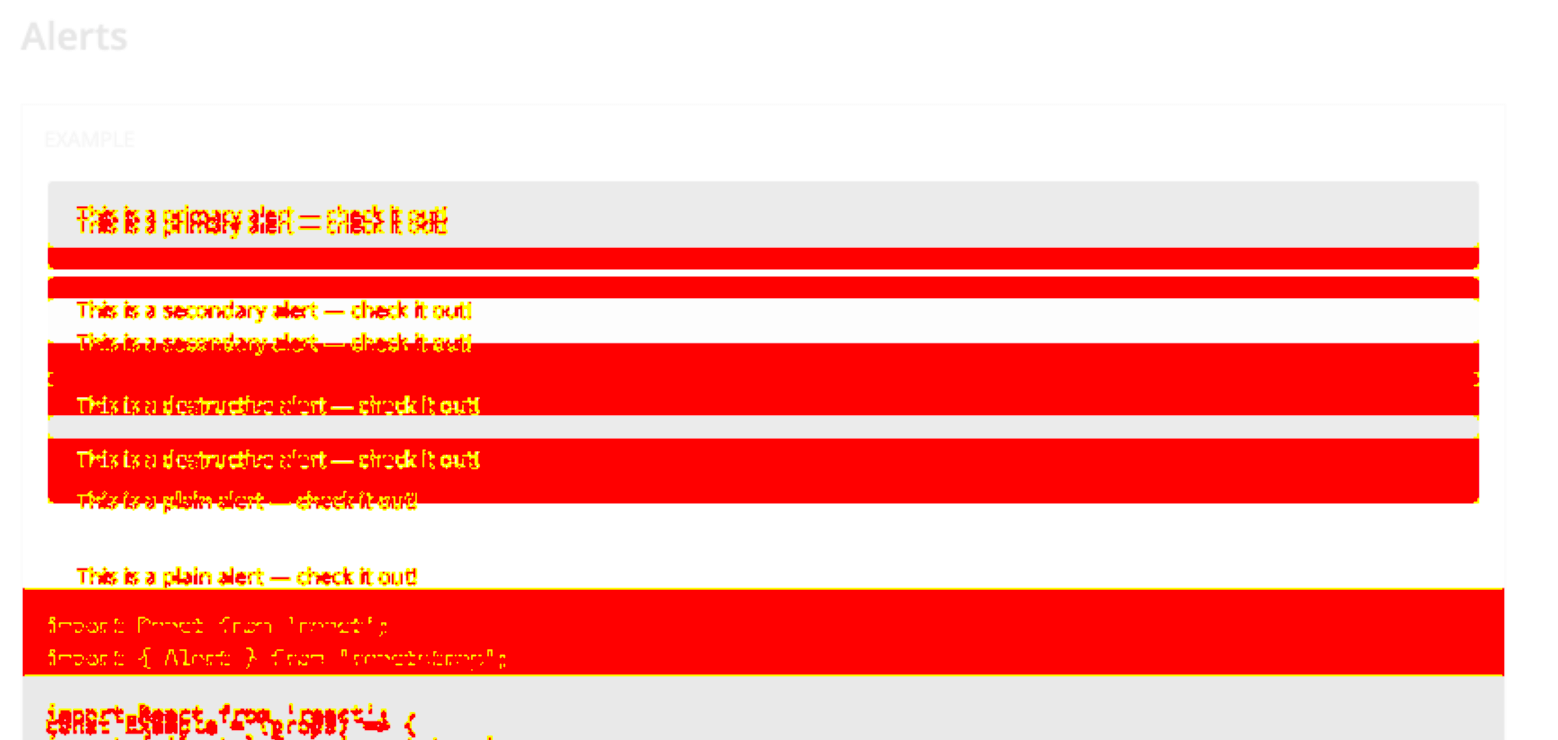
Then, you’ll be able to see a diff file, found by default in __image_snapshots__/__differencified_output__/. What does it look like?
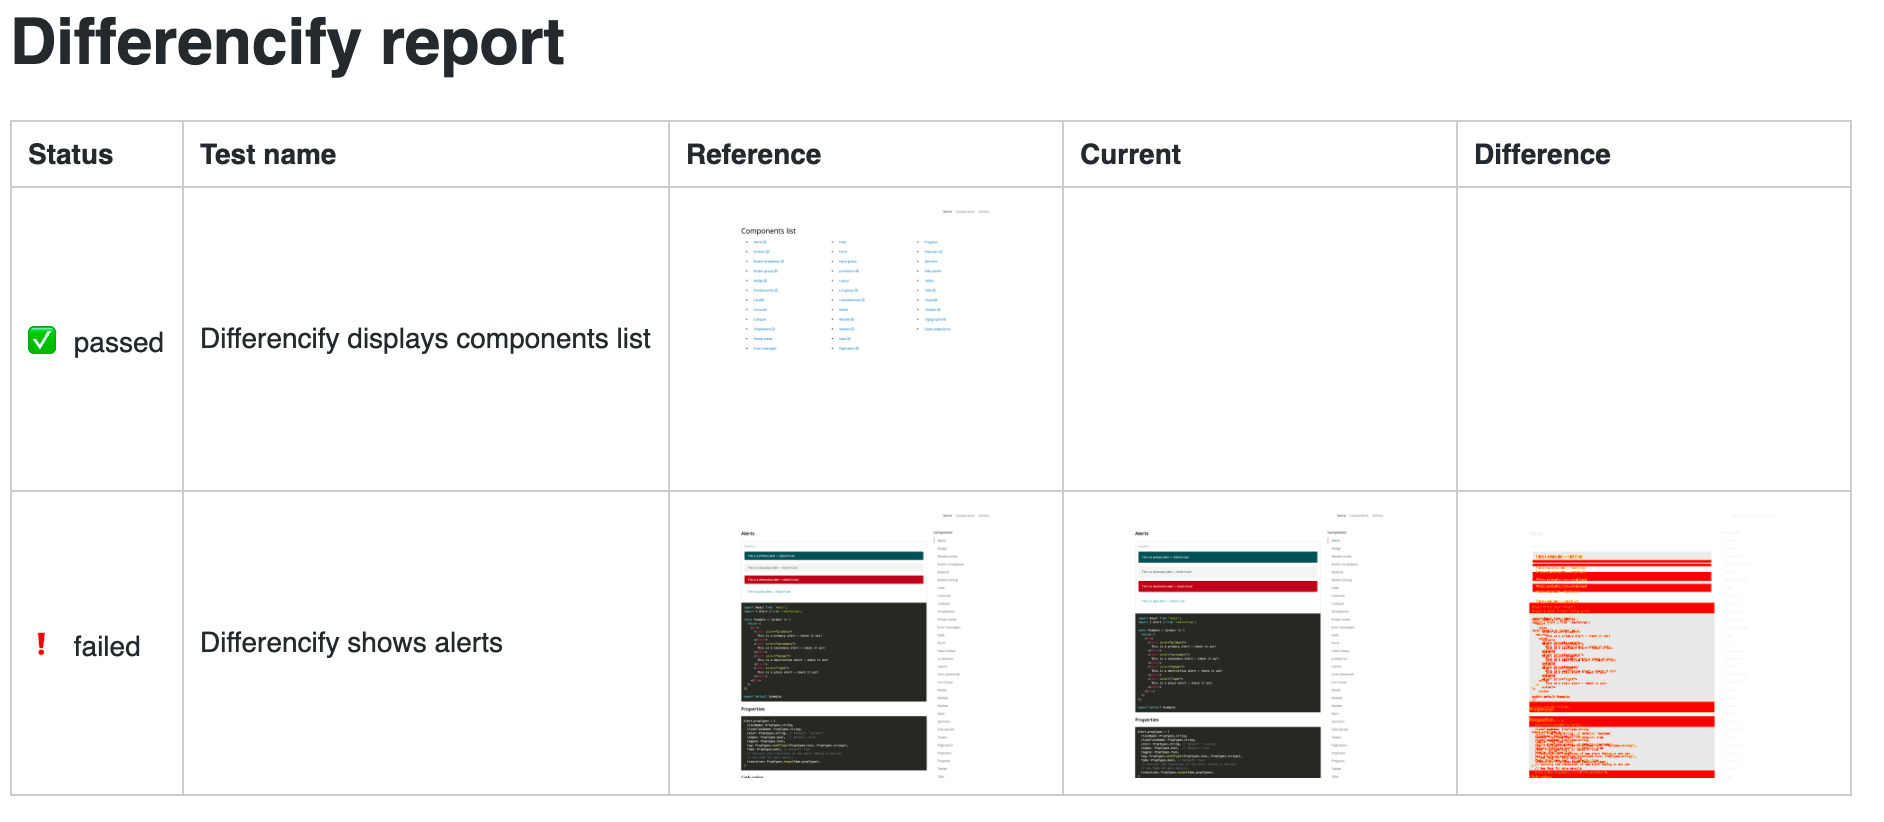
There’s another nice feature – reports as HTML file to help finding differences. To use it, see the next step of this tutorial.
Integration With Testing Frameworks
By default, it’s recommended to use Jest as a testing framework (if you’re not familiar with it, check this link). There is no obligation to use any framework, but this particular one is quite useful and offers a few nifty features:
- Tests are easier to write and are more “human-friendly”
- It’s enough to simply run the
jestcommand for basic use - It comes with Jest-reporter that can be triggered by
jest --reporters default differencify-jest-reporter. Additionally, you need to install it previously by:npm i -D differencify-jest-reporter
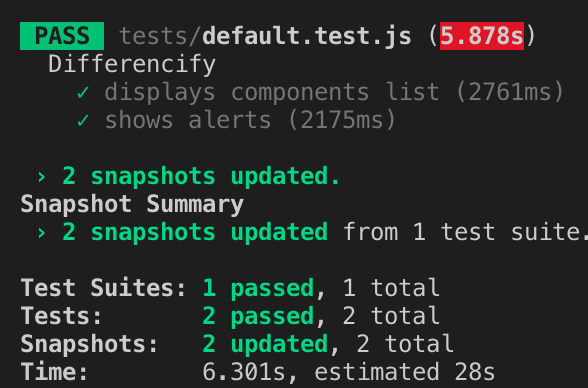
Using Jest-reporter will result in something like this:
What does a basic test look like? See below:
const Differencify = require('differencify');
const differencify = new Differencify({mismatchThreshold: 0});
let urlToTest = process.env.URL_TO_TEST;

describe('Differencify', () => {
  beforeAll(async () => {
    await differencify.launchBrowser({ args: ['--no-sandbox', '--disable-setuid-sandbox'] });
  });
  afterAll(async () => {
    await differencify.cleanup();
  });
  it('displays main page', async () => {
    const target = differencify.init({ chain: false });
    const page = await target.newPage();
    await page.goto(urlToTest);
    await page.setViewport({ width: 1600, height: 1200 });
    await page.waitFor(1000);
    const image = await page.screenshot();
    const result = await target.toMatchSnapshot(image);
    await page.close();
    expect(result).toEqual(true);
  }, 30000);
});
Let’s talk about this code for a while!
First, we use require to obtain Differencify object and then we launch new instance of it. Please take a note that while using new Differencify we’re able to pass some configuration. We recommend to set mismatchThreshold to 0 as by default tests allow small percentage of difference between tests which can cause missing important changes that shouldn’t have been done.
Then, it’s basically smooth sailing. You can write Jest tests using Puppeteer functionalities. You can dig into it by using links that has been provided in the first chapter of this tutorial.
Bitbucket Pipelines Integration
Once you get familiar with Differencify and Jest docs, this manual so far should be quite easy to understand. But how can we integrate this tool with pipelines? Have a look at a simple example below:
image: node:9
clone:
  depth: full
pipelines:
  default:
    - step:
        name: "Example echo automatic script"
        script:
          - echo $BITBUCKET_BRANCH
  pull-requests:
    '**':
    - step:
        name: "Example echo automatic script"
        script:
          - echo $BITBUCKET_BRANCH
    - step:
        name: "Pull request"
        trigger: manual
        script:
          - git checkout $BITBUCKET_PR_DESTINATION_BRANCH
          - apt update && apt install -yq gconf-service libasound2 libatk1.0-0 libc6 libcairo2 libcups2 libdbus-1-3 libexpat1 libfontconfig1 libgcc1 libgconf-2-4 libgdk-pixbuf2.0-0 libglib2.0-0 libgtk-3-0 libnspr4 libpango-1.0-0 libpangocairo-1.0-0 libstdc++6 libx11-6 libx11-xcb1 libxcb1 libxcomposite1 libxcursor1 libxdamage1 libxext6 libxfixes3 libxi6 libxrandr2 libxrender1 libxss1 libxtst6 ca-certificates fonts-liberation libappindicator1 libnss3 lsb-release xdg-utils wget
          - npm i
          - docker build -t testing_page .
          - docker run --name=testing_page -p 8080:8080 -d testing_page
          - npm run test-generate
          - docker kill testing_page
          - docker rm testing_page
          - git checkout $BITBUCKET_BRANCH
          - docker build -t testing_page .
          - docker run --name=testing_page -p 8080:8080 -d testing_page
          - npm run test
          - docker kill testing_page
        artifacts:
          - differencify_reports/*
          - tests/__image_snapshots__/*
          - tests/__image_snapshots__/__differencified_output__/*
        caches:
          - node
          - docker
        services:
          - docker
Let’s discuss these steps:
- First, we need to checkout to the branch that we want to compare our snapshots with. Then, update some packages in order to correctly use docker with pipelines (line 22). You can simply copy this line or adjust it to your needs if you know what you’re doing.
- Next, we install all dependencies (including Differencify, Jest, Jest-reporter) so remember to save it in the package.json file (line 22). At this moment, we’re running a command that builds docker image based on the current branch. Then we run it.
- We use command npm run test-generate to make sure that our snapshots are made from the target branch (it’s a PR scenario). The next step is to kill and remove the docker image, checkout to PR branch, and repeat the docker scenario. Now, however, we’ll run npm run test as we want output from the current branch to be compared with previous (we don’t want to overwrite snapshots we’ve just created)
A detailed description of the steps above can be found in the next section!
Don’t you worry about the “default” step. You can configure it however you want. I.e. run linters, unit tests etc. This step will be performed each time you push something on the branch.
The second step, called “Pull request”, is something that interests us more. We initially thought that pulling a repo would be a good idea, but there are too many problems with configuring access to the repository. (Please note that the first step of the pipeline cannot be manual! That’s why we used an example echo step).
It was enough to simply checkout to the destination branch, generate snapshots and return to the current branch to perform tests. It’s quite easy thanks to two BB variables: $BITBUCKET_BRANCH – which holds a name of branch that we want to merge – and $BITBUCKET_PR_DESTINATION_BRANCH – the name says it all.
Even if we’re switching between branches, our artifacts are stored correctly and we can decide if changes are intentional or made by mistake.
Generating model snapshots
"test-generate": "URL_TO_TEST=http://anyurl.com jest --updateSnapshot"As you can see, we’re passing a URL that will be an example for snapshots. This way we’re comparing new snapshots with staging/production, or simply comparing it with different branches like in the example above. URL_TO_TEST can be the same for generating and comparing if you’re using the docker image for comparison.
Inside the test file we’re capturing this variable using:
let urlToTest = process.env.URL_TO_TEST;
Comparing snapshots with local version
There is one small problem with pipelines – we cannot open more tabs to start e.g. a webserver in the background. As a workaround, you can create a Docker container and run it in detached mode. What does our example dockerfile look like?
FROM node:9

WORKDIR /

COPY . .

RUN npm i

CMD ["npm", "start"]

EXPOSE 8080

It’s role is simple:</pre>
<ul>
 	<li>use local files</li>
 	<li>install dependencies and expose port 8080.</li>
</ul>
<pre>To build and run it, we’ve used a command that you can find in lines 13 - 16 in the bitbucket-pipelines example above. A quick reminder:
<code>- docker build -t testing_page .
- docker run --name=testing_page -p 8080:8080 -d testing_page
- npm run test
- docker kill testing_page
Do not forget to kill it afterwards and remember to use the -d flag to run it in the background and have the possibility to use the command line. Otherwise the next script will not trigger.
Tests output on Bitbucket
If our tests didn’t pass, it would be good to know what exactly went wrong. Of course, we can just check build logs and see which test failed, but then we would be missing the coolest feature – diff files and reporter. To make it possible to reach those files/directories, we need to tell Bitbucket that it can expect some artifacts. Easy as it sounds, you can specify those paths as in lines 17-20.
artifacts:
          - differencify_reports/*
          - tests/__image_snapshots__/*
          - tests/__image_snapshots__/__differencified_output__/*
After the build finishes, the artifacts will be available under “Artifacts” tab above the build logs. They can be downloaded for the next 14 days and checked locally.
Naturally, since their path is known, you can also push them to some public server and make them visible for the client or the whole team without the need for downloading them.